Saturday 20 October 2018

All stitched up with De Witte Engel!

Hi Everyone

Wow! I can't believe this is only my second post of the year. Not long now until Christmas - where has 2018 gone?...

Unfortunately, this year has been rather sparse on the crafting front due to a bulging disc in my neck which was a result of the torn rotator cuff I suffered before that - getting old can be a real pain! I've been experiencing some serious crafting withdrawals due to this and so have had to keep myself distracted with family etc. instead, so I must apologise for being awol.

However, I have been slowly easing myself back into crafting lately with a spot of sewing in preparation for tomorrow's Hochanda TV show at 4pm when I will be introducing De Witte Engel's delightful Santa doll kit to everyone along with some great needle felting kits - I can't wait!


Santa is such a cute doll! (Please note that the bag is not included in the kit - I managed to make it using some of the Nicky velvet I had left over and some white pre-felt I had knocking about the studio.)

As with most of De Witte Engel doll kits you can use a sewing machine for parts of the construction (provided you use the correct needle so that you don't ladder the doll jersey). That said you don't have to. I have hand-sewn all the De Witte Engel dolls I've made so far including Santa and Semmie. 

To do this yourself all you need to know is how to do back-stitch and blanket stitch, both of which are easy and simple to do. For anyone who doesn't know how to do either of these you can google them and find several videos on YouTube or alternatively scroll down and you will see for yourself just how easy they are...


Back Stitch


It's always a good idea to 'bury' the end of your thread so insert your needle elsewhere and come up one stitch into your line of back stitches. 

(If you leave a short tail of thread hanging out, you can hang onto it whilst you make your first couple of stitches and then trim the excess to hide the end in your work.)


Make your first stitch by inserting your needle at the beginning of your line of stitches ie away from the direction your line of stitches are going or backwards.


Bring the needle back up at the same place where you started and make another stitch over the top to secure the thread.


This time bring the needle up one stitch further along the line of stitching.


Now take the needle back down at the end of the previous stitch.


Bring the needle up one stitch length further on in preparation of making the next back stitch.


Take the needle back down at the end of the previous stitch thus making a third stitch. 

Continue in this fashion always bringing the needle up at the end of the next stitch and taking it back down at the end of the previous stitch ie working a line of continuous stitches backwards as opposed to forwards as in a running stitch.


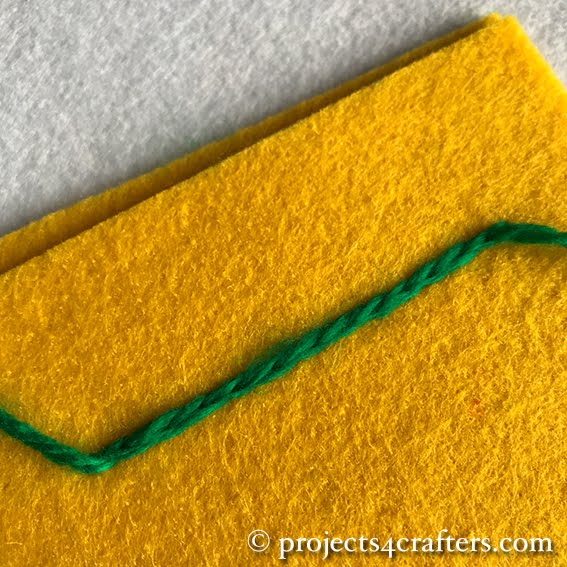
You should end up with a line of continuous neat stitches on one side and a line of overlapping longer stitches on the reverse. 


Blanket Stitch


Tie a knot in the end of your thread and bury it between your two layers of fabric. (Alternatively you can just overstitch a couple of stitches to secure your thread end).


Line up the edges of your two fabrics and insert the needle precisely above where you started.


Pass the needle through the loop created by your thread and pull tight.


Take the needle back down a little way away from the first stitch. Make sure that the needle passes in front of the thread from the first stitch. 

Ideally the second stitch should be equidistant from the start of the first stitch and the edge of the fabrics (forming an imaginary square).


As you pull the thread tight you should find that a loop has been created around it from the first stitch.


Start the next stitch in the same way, the same distance from the second stitch and the edge, as before, making sure that the needle passes in front of the thread from the previous stitch.


Continue in this vein until you reach the end of your fabric. You should end up with a line of neat stitches with a thread decoratively running along the edge of your fabric.


To finish, pass the needle between the two fabrics and the last two stitches.


Before pulling the thread tight pass the needle through the loop created by the thread to create a knot. Then pull tight before burying the end between the two fabrics, trimming the excess as needed.

As you can see neither stitch is difficult to do which makes creating De Witte Engel dolls a lot of fun for anyone who fancies having a go!

Happy Crafting!


Monday 15 January 2018

Heart Doll Comforter

Hi Everyone
Happy New Year!

My new year has started well with a De Witte Engel soft toy show on Hochanda TV with Leonie...


The dolls we had on the show proved very popular too, including this little heart doll...


Made with 100% pure woollen stuffing and beautifully soft flannel this little doll comes in three colourways and is so easy to make. There are instructions in the kit (drawings and written) for how to make the doll and it also tells how, if I mother keeps the doll near her skin (eg overnight), the doll will take on her odour making it even more of a comforter for her baby. The finished doll can be machine washed at 30ยบ on a wool wash or hand washed and then left to dry face up to avoid any watermarks appearing on the face.

You can embroider the doll how you wish eg with a baby's name or hearts etc, but if you'd like to embroider flowers you could do them like this...


1. Attach the embroidery thread to the flannel where you want to create your flower centre. To do this you can just make a couple of tiny stitches or tie a small knot.


2. To make the first French Knot wrap the thread 3 times around the needle.


3. Take the needle back down through the thread-securing knot and up where you want to position the second French Knot. Pull the thread tight to create the first knot.


4. Wrap the thread around the needle three times and go back down beside where you came up and out again where you want the third French Knot (making a triangle of knots).


5. Wrap the thread three times around the needle one last time and again take the needle back down right beside where you came up. This time bring the needle up at the base of where you want your first petal eg. a few millimetres from the first knot.


6. Trim the ends of any threads sticking up in the first knot, leaving you with three neat French Knots.


7. Decide on the length you want your petal to be. Take the needle down beside where you came up and up where you want the tip of your petal to be.


8. Pull the thread, leaving a loose loop. Take the needle  back down beside where you came up, making sure that you have trapped the top of the loop by passing the thread over the top of it. Bring the needle out at the base of the second petal beside another French Knot.


9. Repeat Step 7 to create the next petal.


10. Repeat Step 8 bringing the needle out beside the last French Knot.


11. Repeat Steps 7 and 8 to create a third petal, this time bringing the needle up on the opposite site of the French Knots halfway between the other two petals.


12. Create another petal and bring the needle up between two other petals.


13. Create another two petals so that you end up with a total of six petals (three petals in between the first three).


14. When finishing the last petal bring the needle up close to where your thread comes out, to lock the petal in place.


15. Pass the needle through the loop created by the thread before pulling the thread tight to secure it.


16. Take the needle down through the doll and out through the back, cutting the excess so the end is hidden inside the doll.

I embroidered three flowers on this little heart doll but you can repeat the steps as many times as you like to create as many flowers as you want. 

nb. If embroidering more than one flower you can 'daisy-chain' them by bringing the thread up in the centre of the second flower when locking the last petal of the first flower in place instead of tying off the thread and trimming the excess.

I think this little doll kit would make a fabulous present for a expectant mum or new baby or how about giving a kit to both 'soon-to-be' Grannies with the request that they return the finished dolls on the due date as a way of announcing the happy event. One thing I would highly recommend is that if you do decide to make one that you go for two instead as, speaking from bitter experience, if the little one gets attached to the doll and won't sleep without it it can be a nightmare so it's wise to have a backup in case the first doll gets lost or needs to be washed!

Happy sewing! :)

Friday 8 December 2017

Dreaming of a Wight Christmas...

Hi Everyone

Efco Pappart can be decorated in a variety of ways, whether it be with paints, decoupage papers and mediums or pastes.

It's been simply ages since I got my Jo Sonja paints and brushes out so I couldn't resist having a play with this little fellow to see if I could remember what I learnt about dry brushing all those years ago...


Materials used:

Efco Pappart Figurine Christmas Wight

Jo Sonja Acrylics: 
Galaxy Blue Background Colour
Carbon Black
Nimbus Grey
Warm White
Skin Tone Base
Pine Green
Yellow Green
Napthol Crimson
Napthol Red Light
Jo Sonja All Purpose Sealer

Jo Sonja Brushes:
½ Sure Touch 1315 Possibilities Brush
¼ Sure Touch 1315 Possibilities Brush
2 Sure Touch 2010 Oval Dry Brush

Flat brush for basecoating
Mixing Palette (I use old individual coffee filter lids)
Palette Paper sheet (or you could use deli paper)


1. Mix All Purpose Sealer with Galaxy Blue Background Colour 1:1.


2. Paint the Pappart Christmas Wight figurine with the mix, making sure no Pappart brown shows through. Leave to dry.


3. Mix a touch of the Galaxy Blue Background Colour in with some Carbon Black on the palette paper.


4. Use the ¼ brush to dry brush the boots. 


5. Mix a little more of the Background Colour in and dry brush the boots again, this time painting a smaller area and not covering the whole boot. Focus on the areas you want to highlight such as the tops of the boots and the heels.


6. Mix a touch of the Background Colour in with some Napthol Crimson.


7. Use the ½ brush to dry brush the body of the Wight with the mix, making sure to get into all the nooks and crannies.


8. Add some Napthol Red Light to the mix and use the ¼ brush to dry brush over the red, focusing on the areas you want to highlight to give more depth.


9. Mix some Nimbus Grey with a touch of Carbon Black and Background Colour. Use this to dry brush the Wight's beard with the ¼ brush. Then add some Warm White to the mix and dry brush the highlights of the beard.


10. Mix a touch of Background Colour and a touch of Naphol Red Light in with some Skin Tone Base and use the oval dry brush to colour the nose. Add a touch more Skin Tone Base and add a little highlight on the end of the nose across the top.


11. Mix a touch of Background Colour in with some Pine Green. Dry brush the Christmas tree with the ¼ brush. Use the oval dry brush if needed to get into all the nooks and crannies. Add some Yellow Green to the mix and dry brush highlights on the top and edges of the tree tiers with the oval dry brush.


12. Add a touch more Warm White to the beard highlight mix and use the ¼ brush to stipple a furry edge around the bottom of the trousers and sleeve cuffs.


13. Add a touch of Background Colour to some Napthol Crimson and use it to dry brush the hat. Add some Napthol Red Light to the mix and dry brush highlights where you think the light would catch the hat i.e. on the tip of the hat, across the top of the bumps and around the bottom edge.


14. Use more of the mix from Step 12 to stipple a furry edge to the hat.


15. Use the same mix to add a hint of a shine to the tips of the boots with the oval dry brush. Leave to dry.

If you want you can apply a couple of coats of Matt Varnish to protect your Wight or leave him 'au naturel'!


For a downloadable version of this project go to Projects4Crafters.com


Happy Christmas to one and all!